October 29, 2010

My first photoshoot on the other side of the lens


I have a few shoots lined up in the coming months so far with me as the photographer. I am enjoying the reversal, though I never thought I would get paid to take pictures. I will be posting a sample of some of the shots I did last week. I can't upload them from work obviously. At her request we shot entirely in B&W, these were an anniversary present (lucky guy, huh?) 2 of the upcoming shoots are looking for a similar style. I have a maternity shoot coming up next.

In other photography news, I have a few shoots coming up for myself as well before the first of the year. I took a couple year hiatus for pregnancies but have decided to go back to doing what I love. I'll post some of those to my modeling galleries as they happen. I am very excited for next month, it is with a photographer I have worked with several times over the years. A lot of my published fine art work was his amazing pictures.

I will post as I shoot, both in front and behind the camera. :)

Edit: Added pictures. These are some of my favorites from the shoot.

October 28, 2010

Shadow box project


This was going to be using a wish bone… I had a totally different idea in mind, but alas, life intervened. (In other words, I still can’t find the damn bone) But either way, in my frantic looking for it, I came across a million other things in the random drawers, and the doll arms had to be used.


The box started out with a basic gold interior and a black exterior. I then aged the gold, and made it a little less pretty. I think it made it more pretty to rough it up. I added gold paint to the black and painted a second coat that way to give it depth. Sealed the whole thing with a matte sealer.


The heart is a porcelain slip. I used metallic paint, sharpie and thick gloss sealer on it. I wanted a sort of steampunk look to it. After the fact it occurred to me I had tons of metal findings from making steam punk jewelry and assemblage stuff. I think in the future if I make another heart that is similar I will use real clasps. Ditto for hinges. I might actually break the next one then reattach it to itself with hinges. In any case, this turned out nice on the fly. I mounted this about ¼ of an inch off the bottom, I felt it looked better than being flush against the back. I don’t know, I like things to come out a bit.


The “flame” backing for it was textured card stick. I drew the heart onto it to get an idea of the shape of the top, then freehand cut the flames out. I started with red paint and kept slowing adding yellow to it, painting another further up layer until it became yellow. It took a while but it achieved the look I wanted so that is okay. I gave it a wash of gold to warm it up a bit and then sealed it with gloss.


I put a length of vintage brown ribbon across the top. I love old ribbons and it needed something I think. The arms got wire armature in them to make attaching them easier. I drilled holes in the box for the wire to go through. (I also scared our dog using the drill in the house) I glued and put them through, used eyelets in the top of the box to “finish” the edge of the holes and wound the wire into loops to hold the chain for hanging.


Last but not least… the writing is done in a cool font I downloaded. The quote I’m a bit embarrassed to admit was compliments of the Toad on one of his emo sites. Leave it to overly emotional teenagers to have a great quote on being broken hearted. I used the basic print/packing tape method for making a vellum and adhered it, sanded the top and sealed as well. I used a long chain loop to hang it from a vintage hook. I’m torn on keeping this piece, it actually looks pretty cool in my art room. I have a few offers for it though so it may be getting a new home soon.

October 26, 2010

Almost forgot to post.


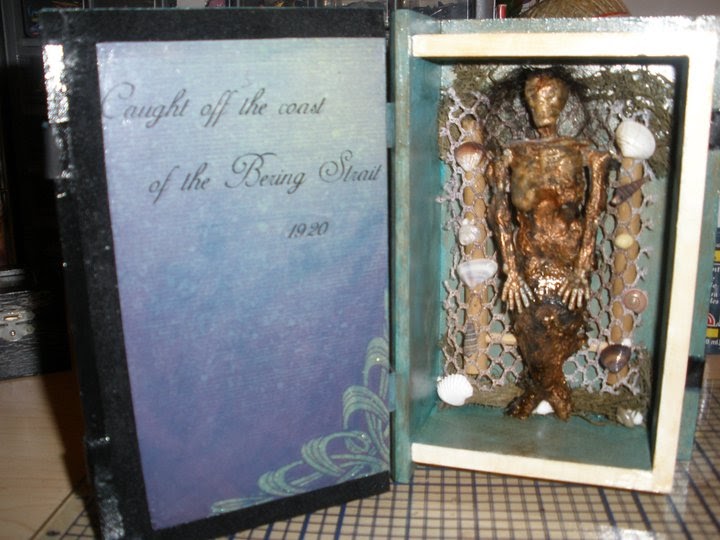
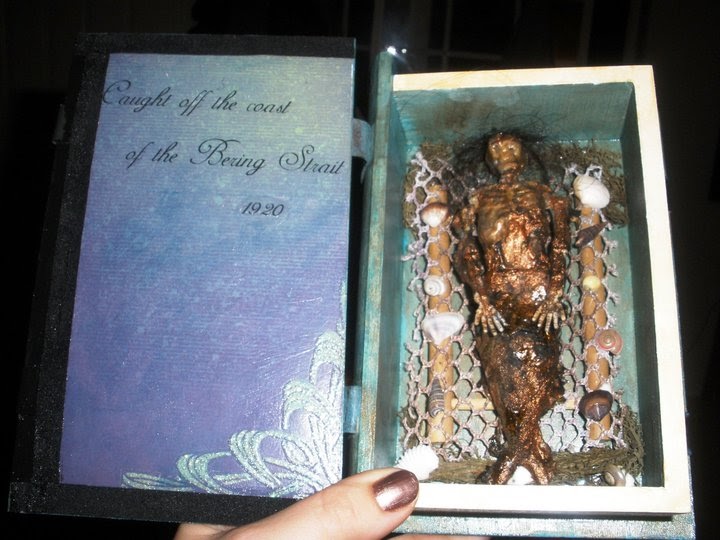
Finished the mermaid!


I dyed some netting with black tea and then walnut ink and paint. This started out as a lingerie bag that had a broken zipper.


I utilized a bamboo soap dish I acquired g-d only knows where for the purpose of bashing. The bashed parts of it are the frame work she is resting on.


The seashells were from our last trip to Morro Bay; I need to book our spring camping trip there now before the sites book all up. For anyone that hasn’t gone, it is fabulous. The bay is perfect for kayaking and there are the cutest otters.


Okay, back on topic…. Reindeer moss looks just like seaweed, in 1/12th scale of course. Obviously that went in as well. I found some at the dollar store and was very excited. Sadly, they were out of the 6 inch skelie’s by the time I went back, so I have to wait for next year to replenish my stash. Luckily I still have quite a few.


I sealed the whole thing with a faux glaze and it is done. I’m pretty happy with how it came out. I am now working on a couple commission pieces and upcoming photo shoots/editing, not to mention the holidays are here and that of course means a ton of baking. I will post pictures of the projects/recipes as they go.


I started on a shadow box last night that so far looks beautiful. I just need to find my misplaced chicken bones for it. I swear I lose things more often the harder I try to put them where I “will remember them”. It never fails. I varnished a perfect wish bone, aged it, then put it someplace “safe”, now I can’t find it. Evil gnomes got it or something.

October 24, 2010

Grrrr

I have been out of the loop for a little while. An uninsured driver basically destroyed my car and I have been swamped dealing with that. All I can say is, thank G-d my husband insists we have amazing insurance and that I always wear my seatbelt. This is the second accident in one year and neither could I have prevented, very frustrating.

My rental car isn't too bad and I was released from the hospital the same day, with what appears to be minimal damage. My car however will be in the shop for another week or two. They are basically rebuilding most of it. I'm rather shocked they didn't total it, the sticker for the damage is slowly creeping up towards the cars value, they may end up doing that after all if more damage is found.

So, I've been sleeping a lot and drugged up on muscle relaxers and pain meds, haven't been making much of anything. I did a lovely photoshoot for my sister yesterday, if I can get her permission to post I may put one of the shots up. Fantastic. I've already got three other people lined up that want me to shoot them. I'm fairly excited to be making money on the other side of the lens.

October 15, 2010

Just keep swimming... just keep swimming


Coming along nicely… Not nearly done yet. But coming along.


I layered several colors of green on the box before hitting it with copper and verdigris. I then put sea salt on the wet paint to dry. It gave it a beach look to the outside I think. The salt brushes right off when you are done. I love the one stroke brushes for this type of paint job, the blotter brush is perfect for this technique.


I used an off white for the “pages” then layered aging varnish on them as well. The writing was done on my laser printer, then lifted with clear packing tape and put on. I sanded it to remove the shine and sealed with faux glazed. There is a bit of glitter embellishment under the writing and velvet ribbon finished the edges.


For my little mermaid (couldn’t resist) I layered more “seaweed” onto her using tissue and water, and then sealed with glue, glaze, walnut ink, paint and whatever else happened to be in arms length from me. Experimentation is half the fun. I hit it with my embossing gun a few times to make it pliable enough to move the arms. Careful doing that by the way, the skelie’s burn pretty easily. They will melt, burn and make an awful smell if you take your eyes off them long enough to answer a kid whining about laundry. Don’t ask how I know, just trust me. :) It is a tough smell to get out of your craft room.


As for her lovely and realistic hair. That was my darling husbands contribution to this project. It is borrowed from my hair brush, cut into short little strands and rubbed the wrong way to give her some hair. I debated fake hair but it was all too thick or the wrong colors (what I had on hand at least) I am now looking for good fake hair as well.

October 13, 2010

The mermaid begins


The fairy idea is now morphing into a mermaid because I thought to myself “If I can make a dead fairy, I can make a dead mermaid”. This is harder than the fairy I found out on day one. More on that later.


In any case, I took one of the 6 inch Skelie’s and took his legs off because mermaids don’t have legs. (duh) From there I made an armature for the tail using wire, masking tape and aluminum. I covered that with polymer clay, texturized it with one of my clay tools, then baked per the instructions. I texturized it because it makes the gnarly stuff stick better than to smooth clay.


So, a side note here. The first tail did not come out okay at all. I will take a picture if I think to later. Even though the armature was thin enough, with the addition of clay, it became bulky looking. I went back to the drawing board, googled a ton of pictures of fins and then started with a much skinnier (it looked too skinny) armature prior to clay. I am not 100% happy with it, but it did come out alright and in the end I decided to work with that; which I pictured. The issue is that in order to get the proper form in armature, it is too thick to be “dead” with clay. Oh well… Also, the clay did not cool all the way before I “tested” its fit with the top half and nearly broke it. Luckily I caught that in time and glued the crack before it became a pain.


Back to the doll herself. Unlike the mummified fairy, she needed to have the look of something that had been pulled from the ocean which presents some new challenges. I gave her skin all the way around the torso basically. Partly to give the illusion of a dried thing from the ocean and partly to more appropriately shift from full tail to bone up top.


I gave her more “seaweed” using tissue and then the sealer, paint, walnut ink, sealer, more paint treatment. This was the most time consuming part, because the layers have to totally dry in between. Days elapsed. You cannot speed this up, I tried. The embossing gun nearly caused a problem, I’d rather not talk about it, suffice to say these things smell bad when they start to burn. :)

October 11, 2010

Pressed fairy book attempts

Without the pressing.... I found these darlng little 6 inch skeletons at the dollar store last halloween and knew I would do something fun with them... Whilst unpacking I found the 'Lady Cottington's pressed fairy book' and the idea was born. Next up; Mermaid...

October 08, 2010

I didn't die... :)

The internet should be up at the house today. I can honestly say this was the hardest move *ever* but so worth it. My art room is almost completely unpacked, and as soon as it is, I can go back to making stuff. I can hardly wait!

This is the view from our front door. Isn't it beautiful???